1. Why It’s Important to Analyze Your Website Performance
 To grow a business’ presence online, tracking and analyzing your website’s performance over time is critical. After all, what gets measured gets managed.
"Analyzing your website performance will not only help you succeed, but it will also help you better understand HubSpot when it comes to subjects like web analytics, data management, and essential website reports."
Thomas Piserchia, Agency M-1 Intern, https://www.linkedin.com/in/thomas-piserchia-02572216a/
Please consider following Agency M-1 on these Social Media platforms.
This post was co-authored by Rachel Sheldon (LinkedIn - Twitter) and Jorie Munroe (LinkedIn - Twitter)
1.1 Reporting helps improve your website's performance.
Reporting alone will not improve your website’s performance, but it will equip you with the information you need to make informed decisions. With the right combination of data and website optimization strategies, what gets measured can also be improved. There are countless analytics tools and different metrics you could be paying attention to on your website, and it can be overwhelming to start.
At a high level, you should be tracking:
- Where your visitors are coming from,
- Which pages they’re landing on, and
- What content they’re engaging.

1.2 How website metrics tell a story.
These numbers tell the story of your website visitors’ journey to becoming customers. They show whether or not your efforts are successful, and if not, where they could be improved. The data you collect about your website will show you how effectively your visitors are moving through their buying journey, from the Attract stage all the way to the Delight stage.

When measured properly, your website analytics will be the objective voice that tells you what’s working and what’s not.
1.3 The impact of measuring website data.
This data will keep you informed so you can hit your goals, identify new areas for improvement, and see how visitors are reacting to the changes you make. This continued conversation between the improvements you’re making to your site and the feedback provided by reporting will ultimately keep you better informed on your website’s return on investment.
1.4 How analytics can inform your website optimization.
Reporting on your website’s performance will help you make data-driven decisions about your website’s design, your content strategy, and the tests you should be running. But you want to make sure that you are measuring the right metrics now so that you have the data you need later.
When analyzing your website’s performance, there are two main categories of analytics: 1) website analytics and 2) traffic analytics.

Website Analytics are the facts and statistics you gather that inform you about the traffic that is coming to and interacting with your web pages. This is a more general term used to encompass a variety of tools that can help you decipher your website data.
Traffic Analytics are a subset of reporting options that looks at the engagement data of visitors at the start of your funnel. This type of reporting focuses primarily on the influx and flow of traffic to your website. Traffic analytics reveal the channels people are coming to your website through, which pages they view, and how long they spend there. You can also track conversions to inform your lead generation efforts.
Before you can get started gathering and analyzing data, ask yourself the following question: “What is my main goal for my website and what metrics can I track to help me achieve it?” For example, your goal may be to increase overall engagement with your website content in order to get more leads. Or, you may want to boost traffic from a specific channel such as LinkedIn.
1.5 Defining your website goals for analytics.
By clearly defining your goals, you can think critically about what data you will need in order to prove that your efforts are successful.
The metrics you choose to track will differ based on the goal you have defined, but it is critical to start from there to ensure you’re analyzing your website with a purpose. To get started, you should at least be tracking page views, sessions, bounce rate, and source data (where your traffic is coming from). For your web pages with CTAs or forms, you should be tracking the clickthrough rate and conversion rate.
Remember, your website data is more than just an abstract number. It represents the direct actions of real people on your website — people who you are trying to reach and engage. That is why you want to capture everything you can about what these people are doing on your website.
Make sure you track people throughout their journey with you, from strangers to customers.
Notice, too, if there are any gaps. Having a good sense of how often your visitors move from one stage of the buyer’s journey to the next will also help you prioritize where you can next optimize your website.
1.6 Using software to track your visitors.
Use additional tracking software, such as heat-mapping, to get even more information about your visitors and how they interact with your site.
2. Using Data to Get the Full Picture
By clearly defining your goals for your website and putting structures in place to track your visitors throughout their journey with you, you will get the full picture of how your website is helping or hindering your marketing efforts. With this data, you can make changes to optimize your website and help you reach your goal.

2.1 Analyzing and optimizing your website is a continuous process.
You should be regularly checking in on your website and traffic analytics reports and asking yourself what you can do to improve those numbers. Don’t just set it and forget it — ongoing reporting and continuous optimization are the keys to building a truly successful website.
2.2 How to access and customize your traffic analytics report in HubSpot.
These are the steps to access your traffic analytics reports in HubSpot and to customize that report to fit your business needs.
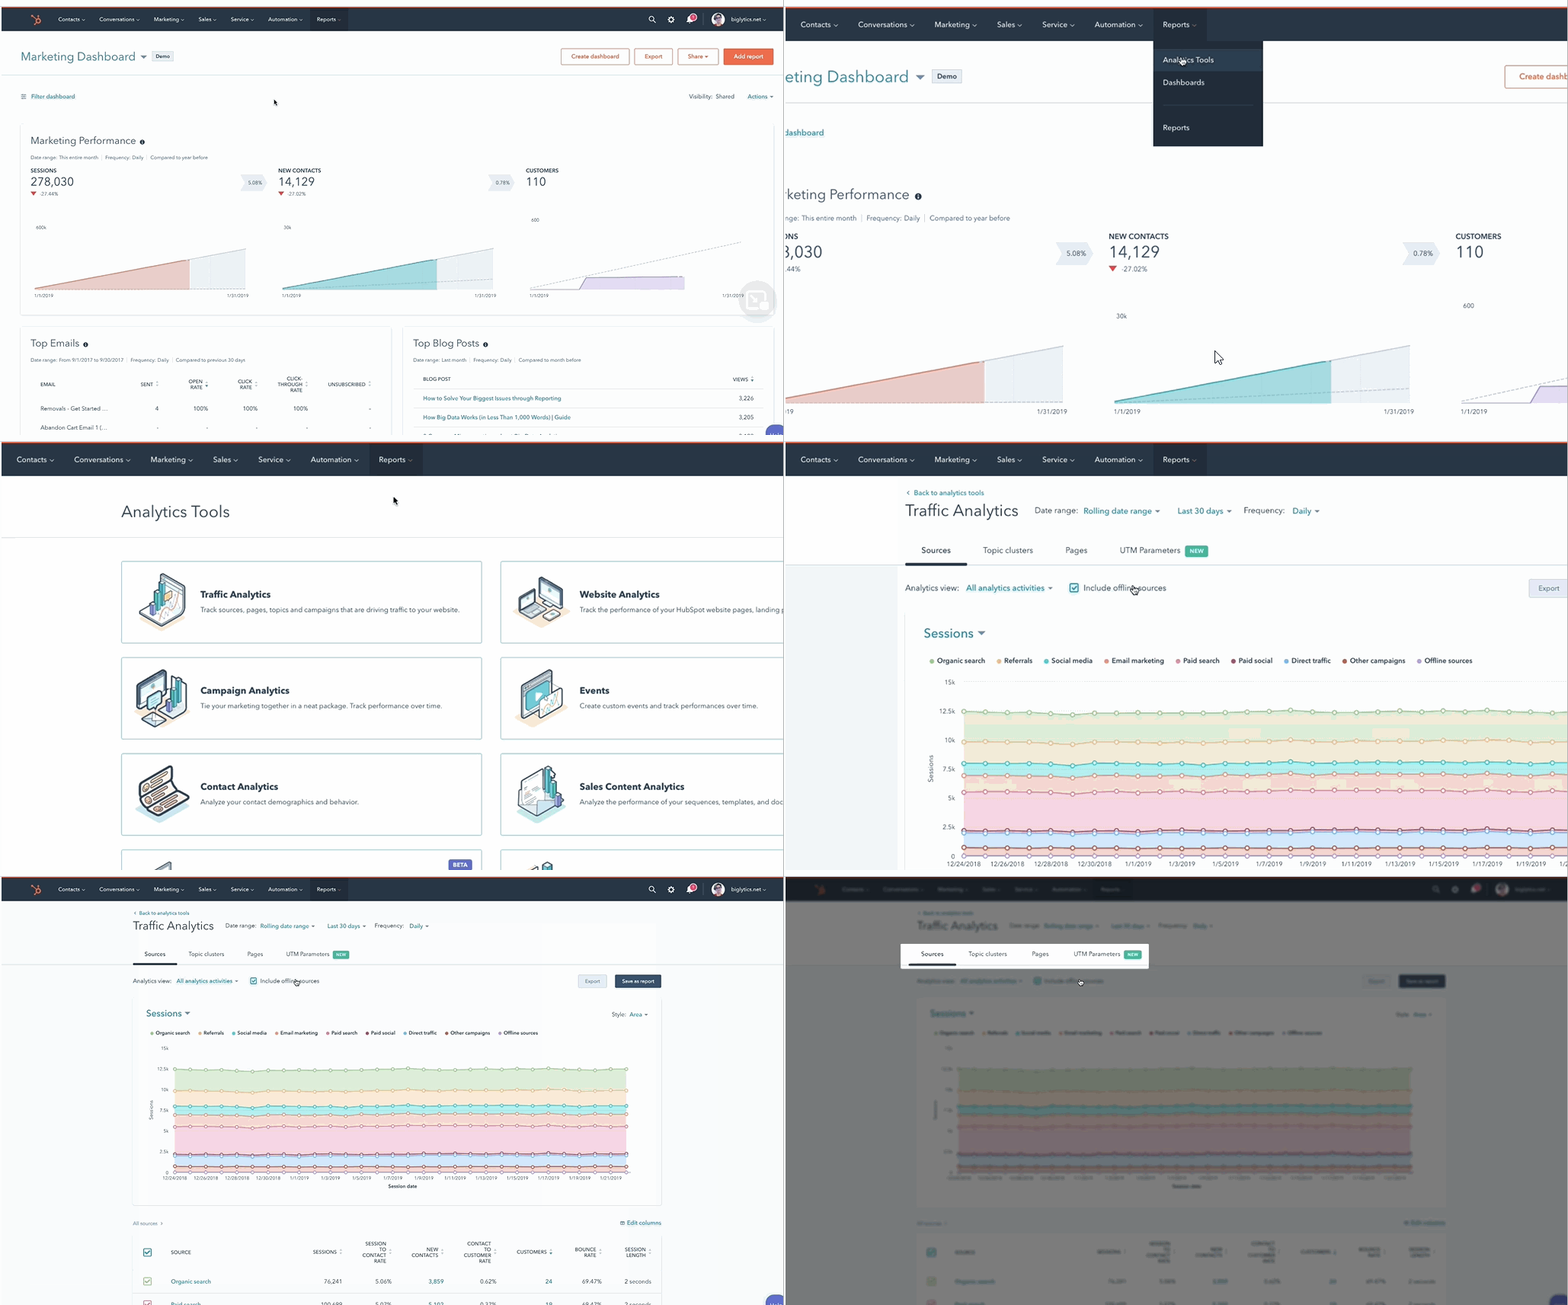
In your HubSpot account, navigate to "Reports" and then select "Analytics Tools".
On the left-hand side, click "Traffic Analytics". This will take you to the traffic analytics tool. On the following screen, you will see the sources, topic cluster, pages, and UTM parameter reports in HubSpot. Each report comes equipped with a detailed visual chart of those particular traffic analytics with a table of data below.
At the top of your dashboard, use the filters to set up your report. These will help ensure you are looking at the right selection of data. At the top of your chart, use the dropdown menu to choose the metric you want to see in your data visualization.
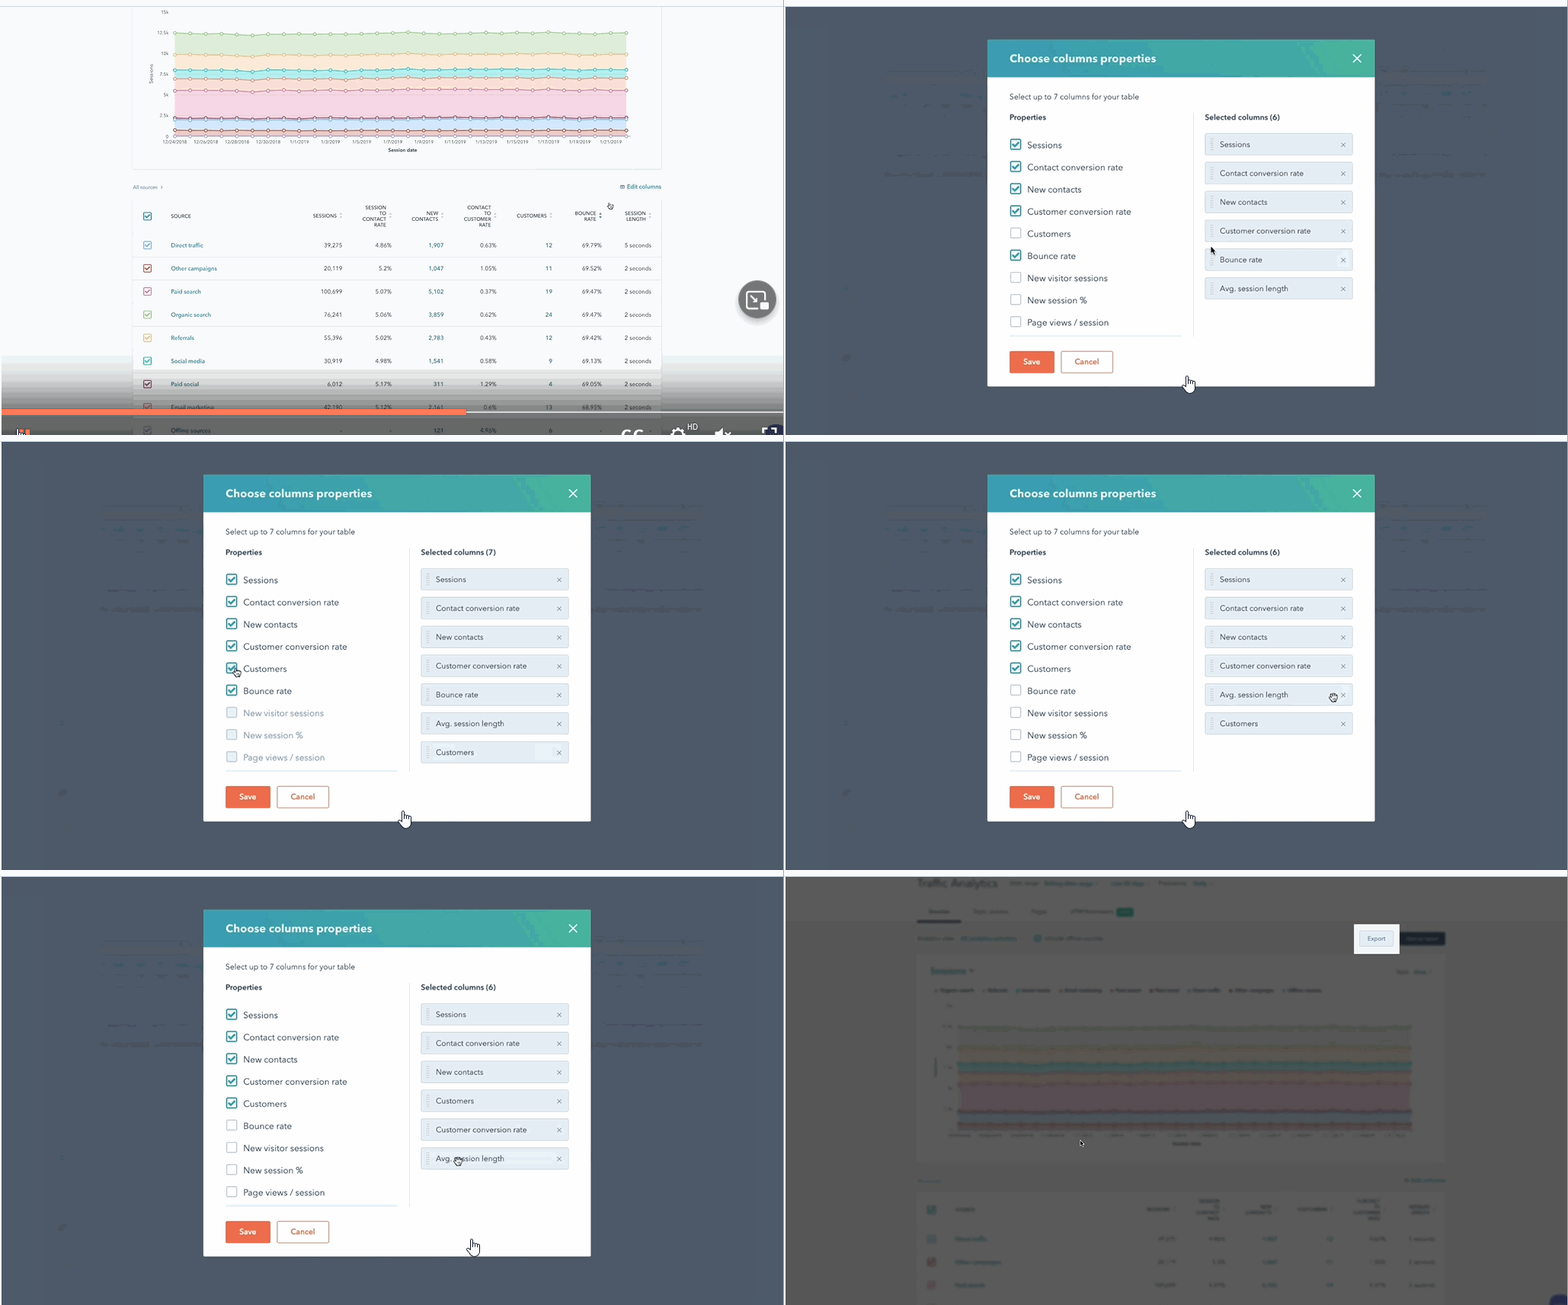
Are you interested in customizing your chart? If you are, use the "Style" dropdown menu to change your chart type. You can choose an area chart, column, line, or a combination of an area and line chart in your data visualization. Below your chart, there's a table with detailed metrics for your analytics. To sort your data by a specific metric, click on that column heading. Click "Edit columns" to change the metrics included in your report. You can choose up to seven (7) of these metrics to populate the columns of this table. Select the checkbox next to a property to add that metric to your report.
Click the "X" next to any of the selected columns to remove it from your report. To re-order the selected columns in your report, click on a property and drag it into place. Click "Save" to apply your changes.

Once you've finished customizing your report, click "Export" to share a file of all the metrics in your table via email. Alternatively, click "Save" as a report to add this report to one of your dashboards.
And there you have it! That’s how you access and customize your traffic analytics report in HubSpot.
2.3 How to access and customize your website analytics report in HubSpot.
In HubSpot, follow these steps to access your web analytics report in HubSpot and to customize that report to see that data that’s most helpful for you.
In your HubSpot account, navigate to "Reports" and then select "Analytics Tools".
On the right side, click "Website Analytics". This will take you to the web analytics tool.
On the following screen, you'll see a detailed visual chart of your website analytics with a table of data below.
Use the filters at the top of your dashboard to set up your report. These will help ensure you are looking at the right selection of data.
At the top of the chart, use the dropdown to choose the metric you want to see in your data visualization.
Interested in customizing your chart? Use the "Style" dropdown menu to change your chart type. You can choose an area chart, column, line, or a combination of an area and line chart in your data visualization.
Below your chart, there's a table with detailed metrics for your analytics. At the top of this chart, you can use the search bar to look up a specific page or post by name.
To sort your data by a specific metric, click on that column heading. Click "Edit columns" to change the metrics included in your report. You can choose up to seven (7) of these metrics to populate the columns of this table. Select the checkbox next to a property to add that metric to your report. Click the "X" next to any of the selected columns to remove it from your report.
To re-order the selected columns in your report, click on a property and drag it into place. Click "Save" to apply your changes.
Once you've finished customizing your report, click "Export" to share a file of all the metrics in your table via email. Alternatively, click "Save as report" to add this report to one of your dashboards.
And that’s a wrap! You now know how to access and customize your web analytics report in HubSpot
2.4 How to create a contacts attribution report in HubSpot.
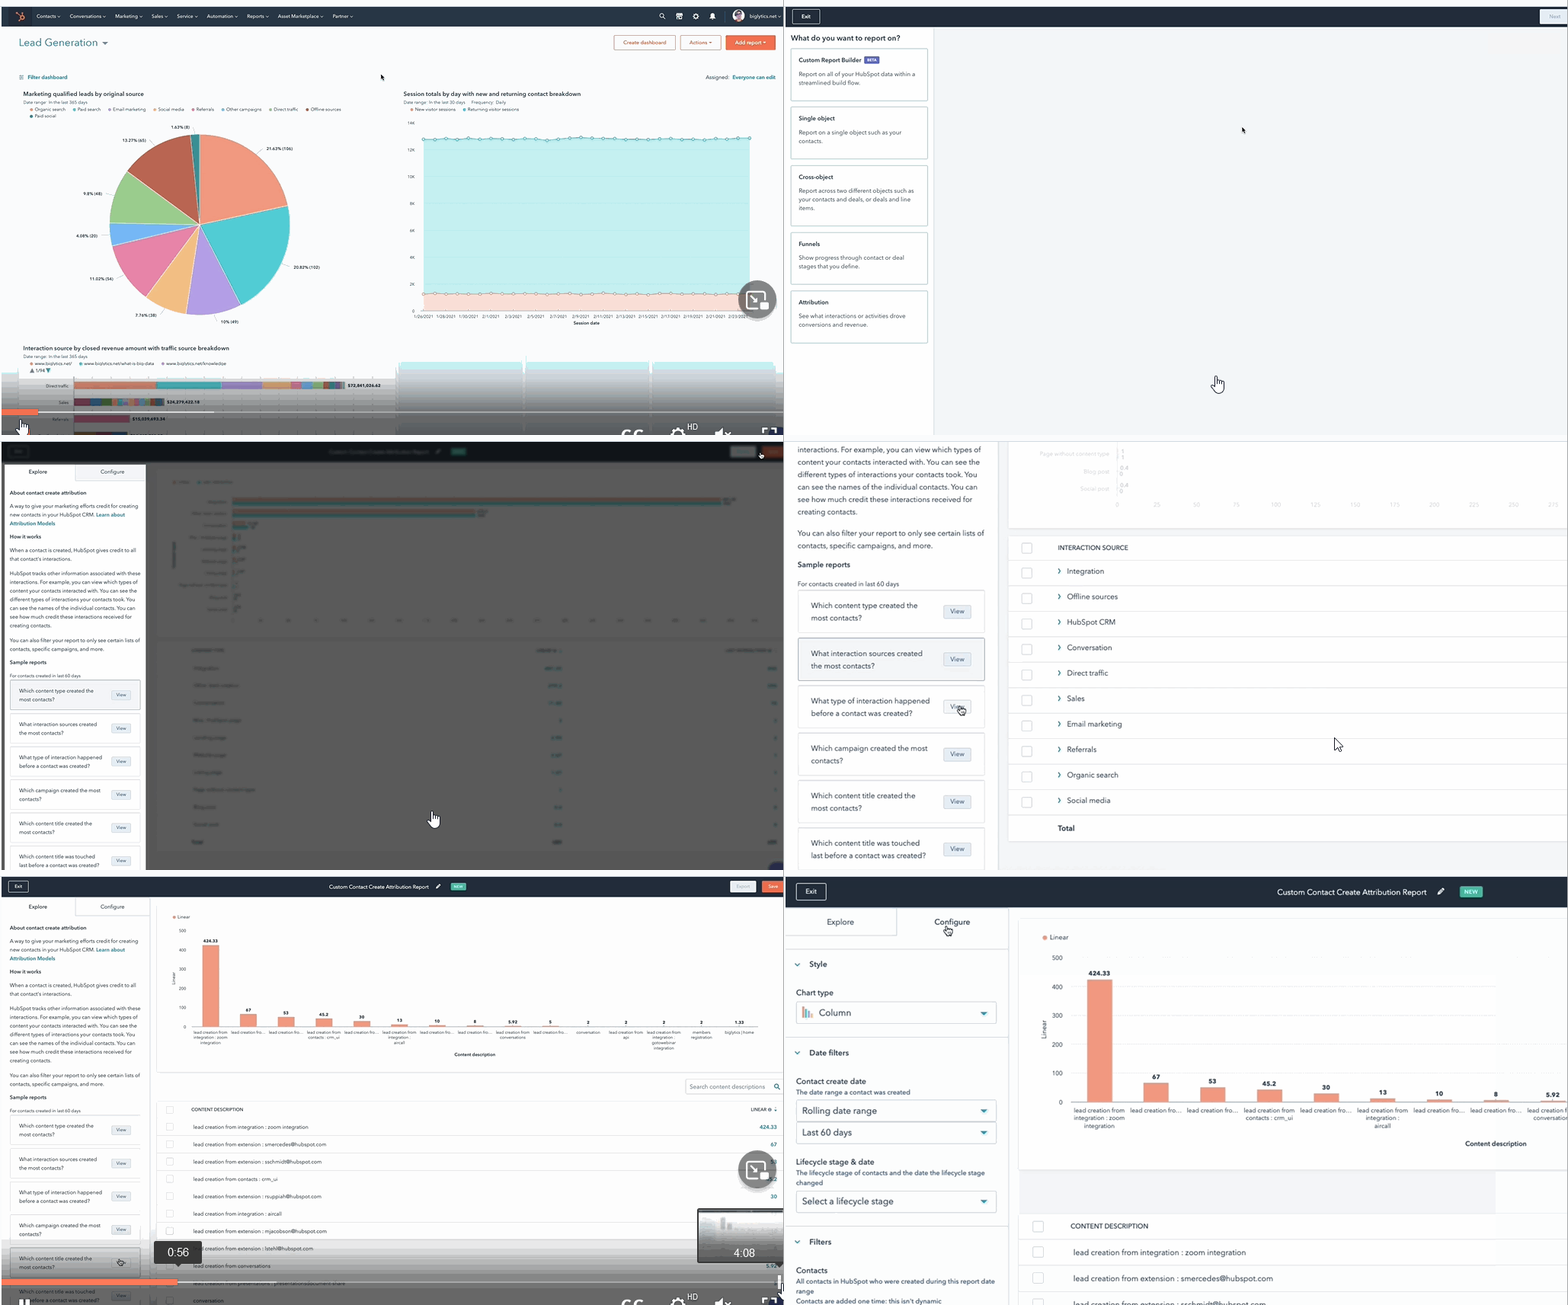
In your HubSpot account, navigate to the "Reports" dropdown menu and then click "Reports".
On the top-right of the following screen, select “Create custom report.”
On the left-hand side, select "Attribution". At the top-right, click "Next". At the top of the page of the following screen, click the pencil icon to name your report. In the "Data" tab, you'll see a list of all the data included in your attribution report. Your data will update to reflect your attribution report filters.
On the left-hand side, use the "List" dropdown menu to choose a specific list of contacts for your report. By default, the report will be set up to report on all contacts. Use the "Date" property dropdown menu to choose any date property to analyze attribution for a specific interaction. By default, the report will use the "Create Date" property to analyze a contact's first conversion on a form. Finally, use the "Date" range dropdown menu to choose a specific timeframe for your report. By default, the report will be set up to report on interactions from all time.

Click the "Visualization" tab to customize your attribution report. In the "Choose chart type" section, click on the chart you want to use for your data visualization. Use the "Metric" dropdown menu to choose a metric to show in your data visualization. Use the "Attribution object" dropdown menu to choose an object to analyze in this attribution report. Use the "Attribution model" dropdown menu to choose your set of rules for assigning credit to the touch points in a contact's conversion path.
Once you've chosen all your filters, click "Run report". You'll see your data and a visualization of your chosen metric. You can continue to adjust any filters to update your report. If you adjust the "Attribution model" type, you'll need to run your report again to change how the data is calculated. Once you've finished making your selections, click "Save" to add this report to your list of saved reports or add it to a dashboard.
Consider taking this HubSpot course to learn the fundamentals of business analytics, managing and visualizing data, and aligning teams around data to make better business decisions.
“Students who join Agency M-1 gain invaluable insight working with real businesses to gain hands-on experience before leaving school. They build connections with executives in the business community and, in many cases, set the path for the beginning of a rewarding digital career.”
-- Brian Meek
Please consider following us on Social Media.
Also, enhance your LinkedIn profile as gain these skills and then apply them in a micro-internship! Learn how!


 Rachel Sheldon
