Create Pages in the Content Management System (CMS)
 Your website is your or your organization's most important digital asset. It is the face of your brand online and the first place people go to learn about you and what you or your organization have to offer.
"Building website pages on HubSpot can give an individual the ultimate learning experience in utilizing content management systems. If the website pages are descriptive, clear, and well-designed, that individual will continue to excel in this profession."
Thomas Piserchia, Agency M-1 Intern, https://www.linkedin.com/in/thomas-piserchia-02572216a/
Please consider following Agency M-1 on these Social Media platforms.
1. What are Pages in the HubSpot CMS?
1.0.1 Your website is made up of pages.
The number of pages on your website can differ dramatically depending on your organization. Some individuals or organizations have smaller websites with just a few highly targeted pages, while other individuals or organizations have expansive websites with hundreds or even thousands of pages.
1.1 Characteristics of a good page
Regardless of the number of pages your website has, all pages need to have three things in common. They must be ...
- Descriptive
- Clear
- Well-designed
1.1.1 All pages must be descriptive, clear, and well-designed.
The first two characteristics of a good page mostly have to do with the written elements of the page — its headline and its copy.
1.1.2 Use descriptive and clear language.
Visitors to your page should be able to immediately determine what your page is about, with no confusion or ambiguity. Use headers, sub-headers, and lists to break up the copy on your page and make it easier for readers to take in at a glance. Keep in mind that each page should be focused on a single goal and ask visitors to take a single action.
1.1.3 Use visual elements for good design.
Visual elements include things like your colors, fonts, images or other media, and your layout. Creating well-designed pages used to be the exclusive job of developers.
If you didn’t have the necessary knowledge of HTML and CSS, you probably wouldn’t be able to build a beautiful web page on your own. But with modern-day Content Management Systems like the HubSpot CMS, this is no longer the case. With easy-to-use page-building tools like drag-and-drop editors and website themes, anyone can create well-designed pages without having to work with a developer.
2. What are the types of pages in the HubSpot CMS?
In the HubSpot CMS, there are two types of pages:
- Website Pages
- Landing Pages
Website pages are the core pages that make up your website (e.g., your homepage, pricing page, and contact page). Landing pages are the pages you use to make offers to your audience.
2.1.1 Website Pages in HubSpot.
The pages of your website will have all different purposes. For example, the purpose of your pricing page is to explain your pricing structure; whereas, the purpose of your contact page is to allow visitors to get in touch with you.
2.1.2 Landing Pages in HubSpot.
Landing pages, on the other hand, are specifically designed to convert visitors into leads. Think of your landing pages as your digital sales reps who are gathering information about potential customers.
So, how do landing pages work? All landing pages use a form to gather information. Without a form, the process of converting a website visitor into a lead on a landing page simply can not happen. Using the information you gather from those forms, you will be able to build and nurture relationships with your leads.
By using both website pages and landing pages in the HubSpot CMS, you can build a website that serves as your or your organization's home base online and it acts as a digital sales rep to convert leads into customers.
3. How to Create a Page in the HubSpot CMS
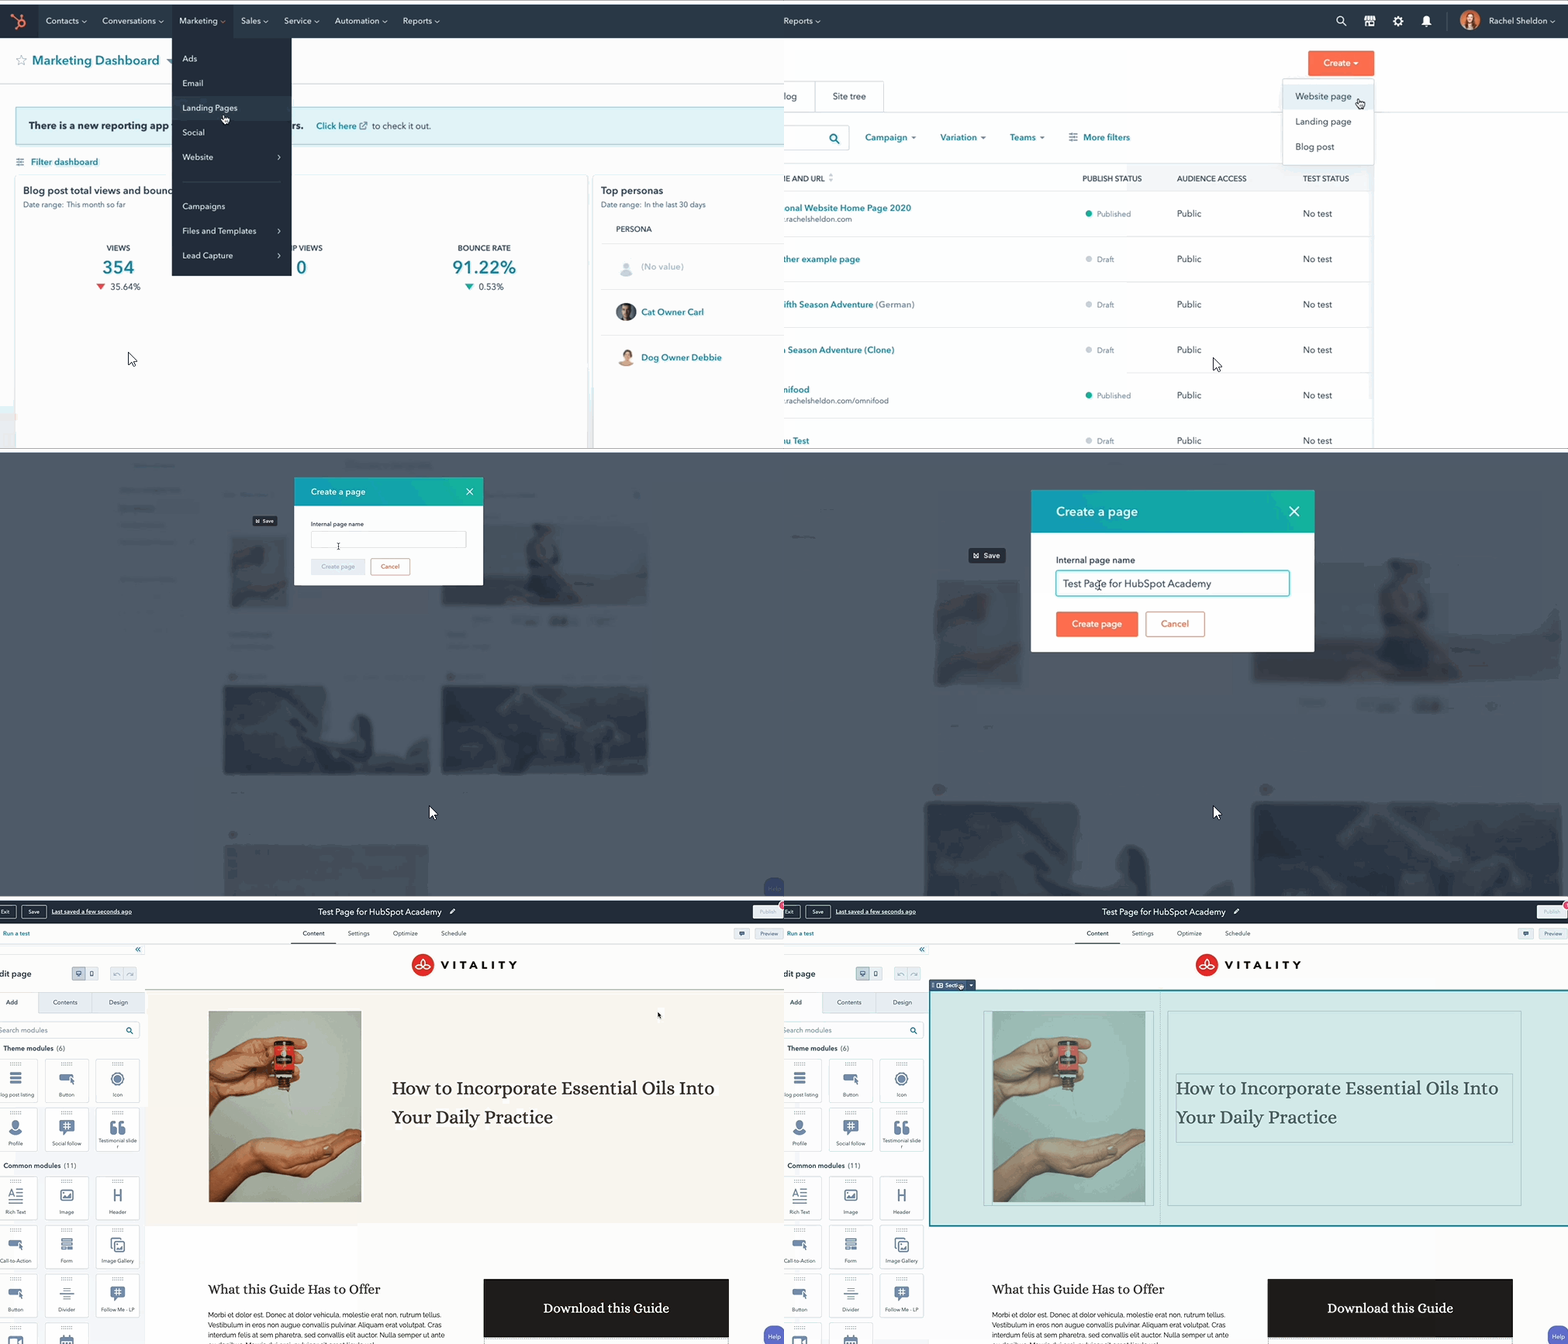
To create a new page in the HubSpot CMS, navigate to “Marketing” in the main menu, hover over “Website” and select “Website Pages” or “Landing Pages” depending on the type of page you wish to create. This will take you to your page dashboard, where you can see all your draft, scheduled, published, and archived pages in one place.
To create a new page, in the upper-right corner, click “Create” and then select either “Website page” or “Landing page”.
On the next screen, select a theme to use for your pages. If you’re working with a CMS developer, they will set up a theme for you to match your branding. If you are not working with a developer, you will have several prebuilt themes to choose from. Select your theme. Next, select the template you want to use for your new page. Depending on the theme you chose, you will have several different template options to choose from.
These templates provide a starting point for the layout and content of your page, but they’re fully customizable. Once you’ve selected your template, give your page a name. This name is for internal use only, so make it descriptive so that you and your team can tell which page it is at a glance. Then click “Create page.”
Next, you will be brought into the page editor.
This editor provides a drag-and-drop interface that allows you to easily change the layout, content, and design of your pages without any coding knowledge.
In the center of the screen is the interactive page editor. Your pages are organized into sections, columns, and rows. These are all made up of modules, which are blocks of content. As you hover over each section of the page, it will be highlighted.
At the top of the screen, there are tabs for the page’s content, settings, and SEO optimizations. There’s also a “Schedule” tab where you can choose to schedule your page to publish at a later date and time.
In the page editor, the left sidebar has three options: “Add”, “Contents”, and “Design”.
The “Add” screen is where you can add new modules to your page, such as a form, an image, a button, or a block of text. The “Contents” screen displays a list of all the content modules on your page in the order they appear. The “Design” screen is where you can view and edit your theme settings. Editing your theme settings will change the design of multiple pages on your website.
You can also undo and redo changes to your page using the buttons at the top of the left sidebar.
3.1 How to Edit the Layout of a Page in the HubSpot CMS
Using the drag-and-drop page editor in HubSpot, you can design the layout of a page in just a few clicks.
First, navigate to your page's dashboard by clicking “Marketing” in the main menu, hovering over “Website” and selecting either “Website Pages” or “Landing Pages”. To edit an existing page draft, click its name. This will bring you into the page editor.
In the left sidebar under “Add”, you’ll see several options for common modules you can add to your page. To add one, simply click and hold it, drag it into the interactive editor where you want it to appear on the page, and drop it.
To move a module after you’ve added it, click and drag it to a different part of the page. You can also drag entire sections, rows, and columns to rearrange the layout of your page.
To see an overview of all the modules on your page, click “Contents” in the left sidebar. This will display a list of all the content modules on your page in the order they appear. To remove a module from the page, hover over its name and click the trash icon.
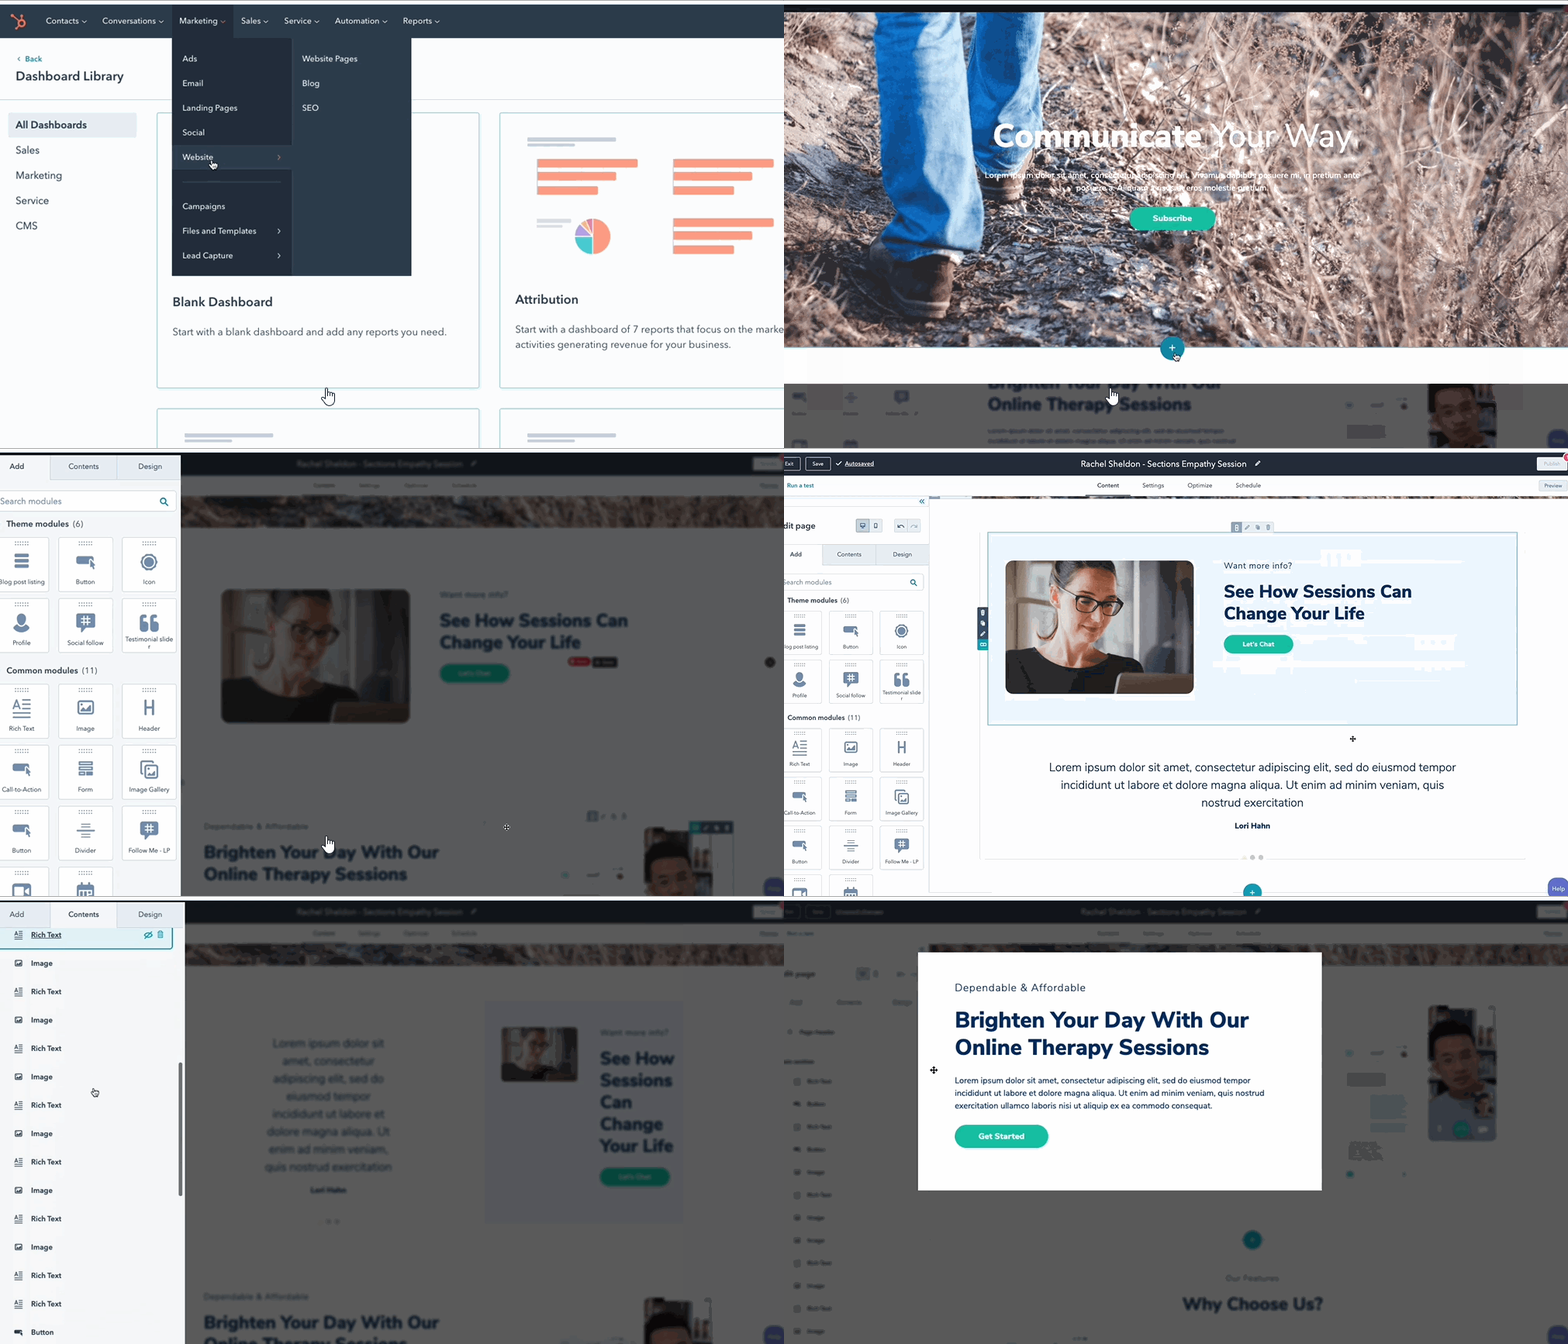
To remove an entire section, row, or column from the page, hover over it in the editor, click the arrow, and choose “Delete”. You can also delete modules directly from inside the editor by hovering over them and clicking the trash icon.
To quickly duplicate an entire section, row, or column on your page, hover over it in the editor, click the arrow, and choose “Clone”.
3.2 How to Edit the Style of a Page in the HubSpot CMS
In the HubSpot CMS, your website is styled using a theme. This theme applies to all pages on your site and allows you to easily maintain a consistent look across your site.
If you are editing a page and want to make changes to its styling, navigate to the “Design” tab in the left sidebar. Here, you can edit your theme settings, which will affect all pages on your website. If you’re working with a CMS developer, they will set up these theme settings to match your brand. Check with them before making any changes.
You also have a few options for styling your sections, rows, columns, and individual modules in the page editor. To style an entire section, row, or column, hover over it, click the arrow, and choose “Style”. In the “Background” tab, you can add a background color or background image to this section of the page. In the “Alignment & Spacing” tab, you can set the content alignment as well as the padding and margins.
When you are done editing, click “Back” to return to the full module list. All your changes will be saved automatically, but you can also click the “Save” button in the upper-left corner. Undo and redo your changes using the arrow buttons in the left sidebar. To revert your changes back to the page’s original design, click “Reset all styles”.
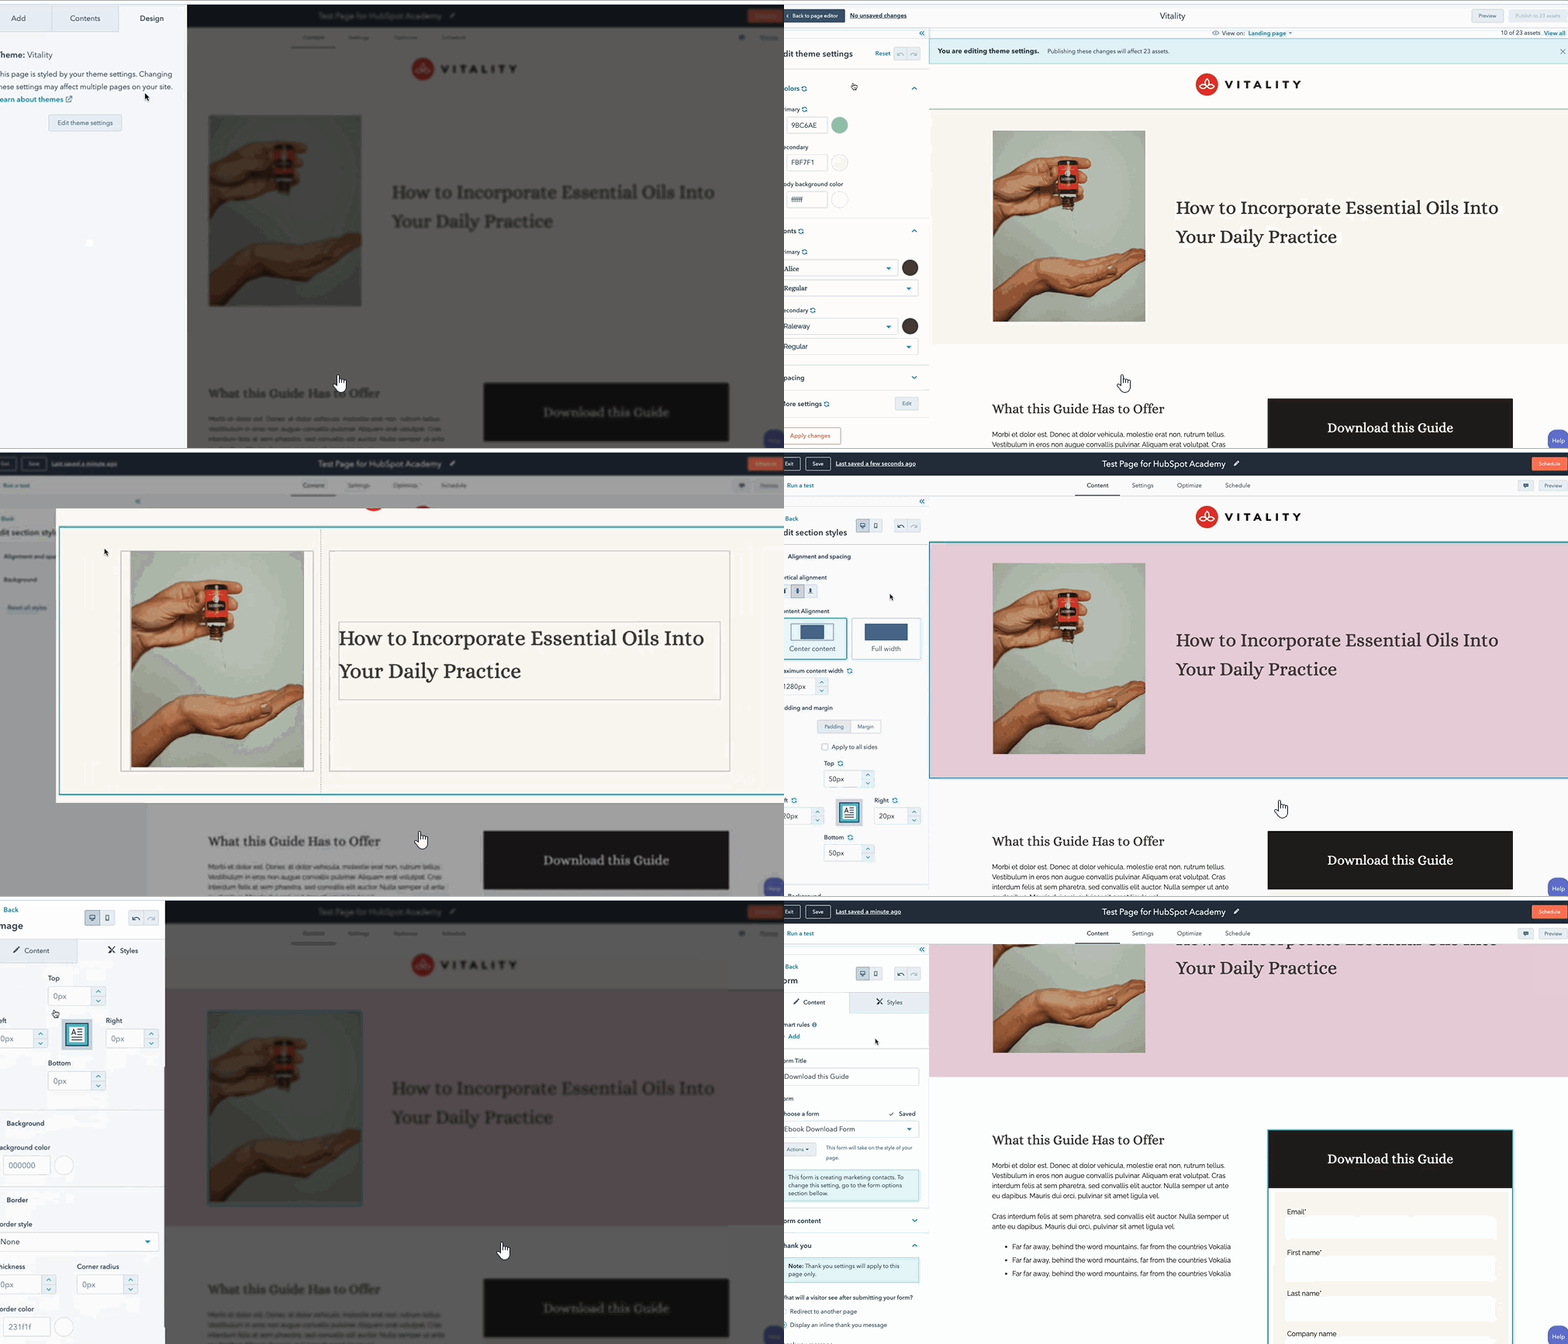
To style an individual module, hover over it in the editor and click “Style module”. In the left sidebar, you will see all the styling options for that particular module — these will change depending on the type of module you choose. You can change things like the module’s alignment and spacing, its background, its border, and its opacity. For form modules, you can edit the style of the overall module, the form fields, and the form button.
To edit the contents of the module, switch over to the “Options” tab in the left sidebar. These will also change depending on the module you are working on. When you are done editing, click “Apply changes”.
3.3 How to Publish a Page in the HubSpot CMS
Before you can publish your page for the world to see, there are a few things you need to do first.
Click the “Settings” tab at the top of the screen to edit your page settings. These include your page title, URL, and meta description, which will all determine how your page appears to web browsers. You can also set a featured image for your page which will appear when you share it on social media.
Under “Advanced Options”, you can require a password to view the page, set the page to expire on a certain date, add code snippets, use this page in a HubDB table, edit the page template, and customize its canonical URL.
Next, click the “Optimize” tab at the top of the screen. You’ll see a checklist of optimizations you can make to improve your page’s SEO so that it ranks higher in search engines.
The last step before publishing your page is to preview it. In the upper-right corner, click the “Preview” button. Here you can preview what your page will look like on different devices — this is important to ensure that your page is optimized for tablet and mobile screens. You can also preview how your page will appear to specific contacts in your CRM, which is important if you are using smart content on your page.
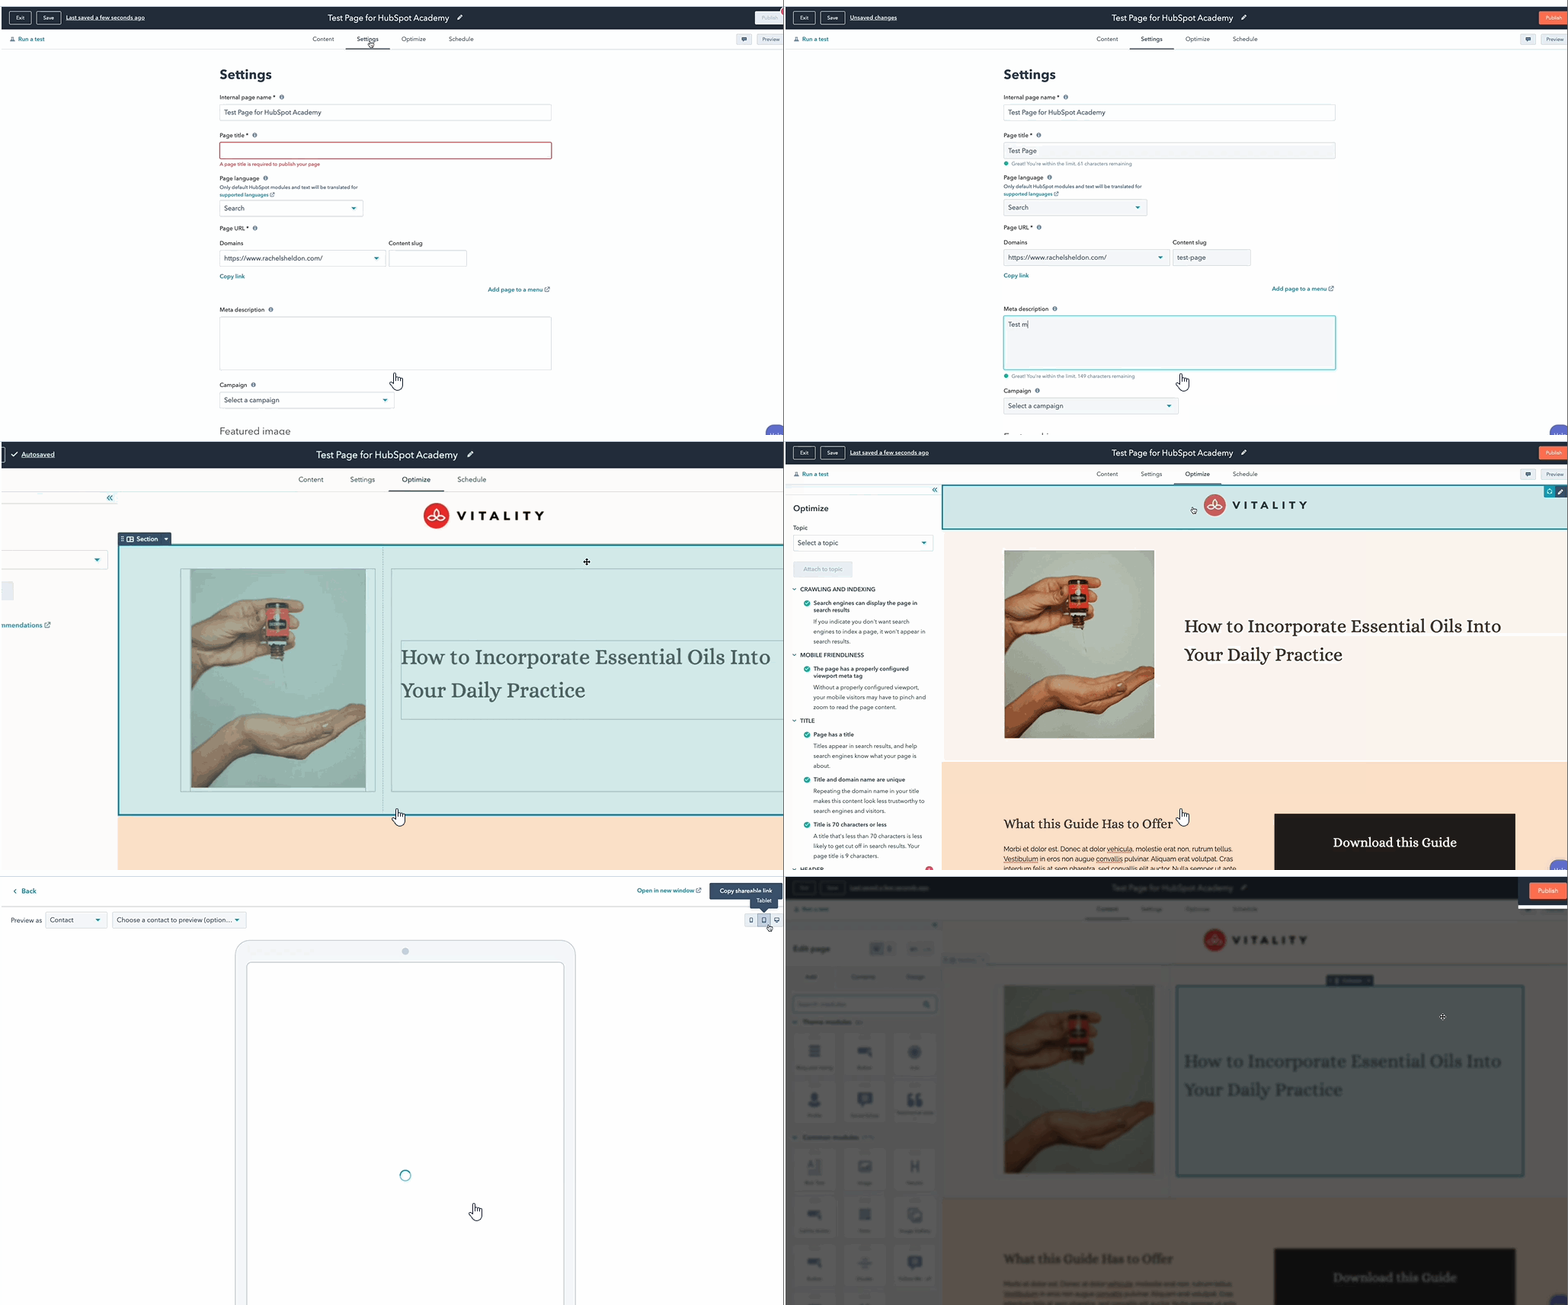
To set your page live, in the upper-right corner, click the “Publish” button and select “Publish now”. You can also click the “Schedule” tab and choose “Schedule for later” to set your page to publish at a later date and time.
“Students who join Agency M-1 gain invaluable insight working with real businesses to gain hands-on experience before leaving school. They build connections with executives in the business community and, in many cases, set the path for the beginning of a rewarding digital career.”
-- Brian Meek
Please consider following us on Social Media.
Also, enhance your LinkedIn profile as gain these skills and then apply them in a micro-internship! Learn how!


 Rachel Sheldon
